Difference between revisions of "Adding Drop Shadows"
m |
m |
||
| Line 47: | Line 47: | ||
As an example, below is what happens when we use the "3D Wood" effect on a simple shield: | As an example, below is what happens when we use the "3D Wood" effect on a simple shield: | ||
[[File:Screenshot 2023-11-14 at 22.52.12.png| | [[File:Screenshot 2023-11-14 at 22.52.12.png|350px|Inkscape 3D Wood Filter example]] | ||
=== Trouble Shooting === | === Trouble Shooting === | ||
Latest revision as of 22:58, 14 November 2023
And Other Filter Effects
When creating shields we can use the Preferences Pane to chose the overall appearance. Almost all of these effects are based on those available in Inkscape, but represent just a handful of the available filters. In this tutorial we will look at creating effects beyond those available in the preferences pane, and will use Drop Shadows as an example.
Drop Shadow Basics
When creating basic shields we can use the preferences pane to chose the "Shiny" appearance. This tries to make shields look a little more authentically metallic by putting a highlight in the top left and adding a coloured drop-shadow to the bottom left.
The other appearance choices may well bring in other effects but none of them include the drop shadow. If we wish to add a drop shadow to one of the other appearance choices we can use the following process. Applying other filters all work the same way.
Saving as SVG
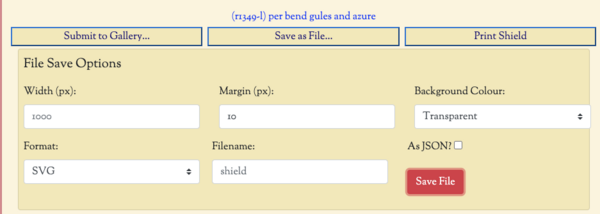
Using the create page draw your shield using whatever preferences you chose. When complete, click on the "Save as File..." button and make sure that you choose options as per the image below:
This will place a file called 'shield.svg' in your browser's downloads folder.
The margin is important as it gives the shadow, and other filters that affect the edges, somewhere to fit. You make it bigger or smaller depending on your needs but 10px is a good size to start with.
Open in Inkscape
Start the Inkscape program (available from https://inkscape.org ) and use "File -> Open" to open the file that you have just downloaded.
IMPORTANT: Make sure that the "Selector tool" (arrow) is active and click once on the shield itself to select it.
Add the Drop Shadow
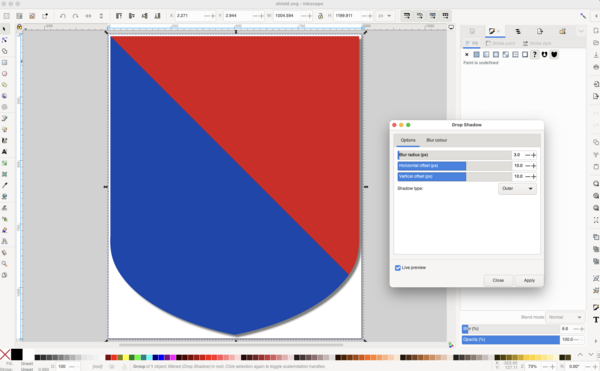
From the menu choose "Filters -> Shadows and Glows -> Drop shadows...
This brings up a dialog box which allows you to set the bluriness and the offset, typically you would use whatever you set the margin to earlier.
Also, click on the "Live Preview" radio button to see the effect before you apply it.
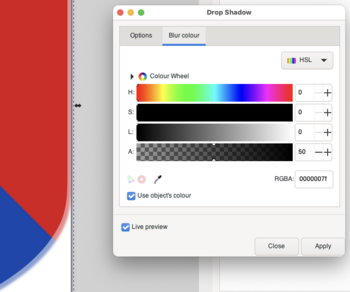
You can use the "Blur Colour" tab of the Drop Shadow dialog to choose your own colour instead of the default grey; or you can tick the "Use Object's Colour" if you want to pick up the edge colours of the shield for the shadow.
When satisfied with the appearance click the "Apply" button
Trying Other Filters
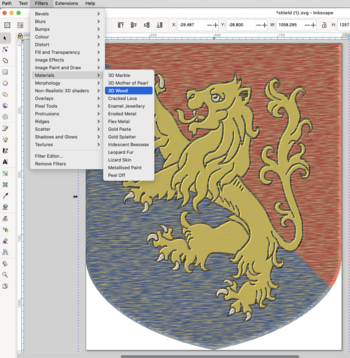
There are many other filters available, explore the Filters -> ... menu - they don't always work but most of them will product some sort of change so it is worth experimenting. You can use Edit -> undo in Inkscape to go back a step and it is possible to combine Inkscape effects.
As an example, below is what happens when we use the "3D Wood" effect on a simple shield:
Trouble Shooting
The most important thing to check is that the shield is actually selected with the selection tool (there should be a dotted selection box around the shield) - the filter must have something that it is applied to.
It is probably best to start from the "flat" appearance when saving your shield in SVG format, but try the different colour palettes which will affect the overall look.
And don't forget the Undo option!
Save or Export
You can now save the file, or use Inkscape's File -> Export command to save in whatever size and format you require.
